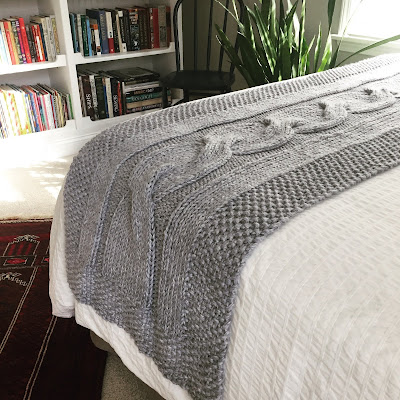
Last weekend I knit up the first square of the Traveling Afghan project!
This 10” x 10” square was really quick to knit and I love how it turned out!
Alexandra of Two of Wands released the pattern for this first square on her website earlier this month. She said this basket weave stitch pattern was inspired by designers from 7 different countries coming together to collaborate on this year-long project.
 |
| First square of the Traveling Knit Afghan project...before blocking. |
As I knit this square, I reflected on how much I value the opportunity to connect with knitters close to home in Kansas City, throughout my country and around the world through our love of yarn and knitting. I was thinking of my in person knitting friends and the wonderful makers I have connected with
on Instagram,
Facebook and
Ravelry.
Keep reading below for tips on how to block the Traveling Afghan squares.
Click here to get the instructions for square #1 on the Two of Wands website.
FEBRUARY 2020 UPDATE:
WHAT IS THE TRAVELING AFGHAN PROJECT:
The Traveling Afghan is a collaborative project being created by designers around the world. The project is sponsored by Lion Brand Yarn (they are providing yarn and underwriting all shipping costs!) and is being coordinated by the lovely and super organized Alexandra of Two of Wands.
Approximately every two weeks the Traveling Afghan will be mailed to a designer who will add their 10"x 10" square to the blanket.
When the designer reveals their square they will provide the instructions on their website for
free. Makers can follow along through the year, collect the pattern instructions from each designer’s website and create their own sampler style afghan.
You can participate by using
worsted weight yarn from your stash,
purchasing a kit from Lion Brand Yarn website [affiliate link], or purchasing your preferred worsted weight yarn. (The project will require approximately 3,150 yards. More yarn needed if using multiple colorways.)
I am thrilled to be one of 25 knitting designers participating in the Traveling Knit Afghan project! This year-long collaborative effort will feature stories from the designers about their paths as makers, and will give you the opportunity to learn new stitches.
Would you like to participate? It’s not too late to join in the fun! Click here to read LOTS more about this project on my new Fifty Four Ten Studio website, including a list of all the designers participating in the project, on my Traveling Afghan blog page.
HOW TO BLOCK A TRAVELING AFGHAN SQUARE:
For best appearance, I
highly recommend blocking each of the squares for the Traveling Afghan. Blocking works wonders to train your knitting to the desired dimensions and will improve the appearance of stitches.
If you have not blocked your knitting before this project is a great time to give it a try!
My plan is to block each square as I complete it so it won't be a huge project to block all 24 squares at the end of the year....that's the plan anyway!
NOTE: You may notice in the photos that
I did not weave in the ends on my knitted square. Normally...I recommend weaving in all of the ends on the knitting project
before blocking. For this project where many 10" square knitting pieces will be sewn together...I left very long ends and I will use those end pieces to sew the squares together as I join together the squares.
Here are the steps I used to block my first Traveling Afghan square....
1. Soak the finished square in a bowl of cold water for about 20 minutes. Use your hand to push the knitting under the water so all parts of the knitting are submerged and wet.
 |
| Soak in a bowl of cold water. |
2. Transfer the knitting to a colander (a bowl with holes in the bottom for draining pasta, etc.) and let the knitting sit for 10 - 15 minutes and allow some excess water to drain off.
 |
| Use a colander to drain excess water. |
3. Place the knitting on an old towel and allow it to sit for a few minutes. This will help soak up a little more excess water. Be sure to use a towel that is similar in color to your yarn...or one that will not transfer color to your yarn. (In other words, don't use a red towel with white yarn or you could end up with a pink knitted square!)
 |
| Transfer to an old towel to soak up some excess water. |
4. Transfer the knitted square to a foam blocking mat, adjust the knitting to the desired size (for this project each square should be 10" x 10") and then pin the edges in place using rust resistant T-pins or sewing pins.
Be careful with the pins...they can go through the mat and scratch the surface underneath!
 |
| First square of Traveling Afghan pinned on the blocking mat. |
Take your time on this step. Carefully adjust the knitting so that the stitches on the edges and center of knitting are straight and even. Use the edges of the mat and a measuring tape or ruler as a guide to make the edges very straight and
position the knitted square so it is 10" high x 10" wide.
Check the stitches in the center of the piece and adjust as necessary to make the rows straight and even.
About blocking mats....
I have two sets of
POCO-DIVO "child play mats". Each set includes nine 12" mats that fit together like puzzle pieces. (One piece shown in the photo above.) I have two sets so I have enough pieces to make a mat large enough to block large blankets.
(Over the last few years, I have published about 30 blanket knitting patterns...so I have blocked a lot of blankets in recent years!)
There are other blocking mat products available...including
this set of 9 white mats with grid lines and 150 T-pins or
this set of thick mats with grid lines and a box of T-pins.
Another idea I learned from one of my customers is to use yoga mats or exercise foam mats for blocking...what a great 'multipurpose' idea!
If you do not have blocking mats...it is definitely possible to have good results without them. You can set your knitting up on old towels or a sheet...just make sure the surface underneath is water resistant.
5. Allow knitting to dry. If desired, set up a small fan to expedite the drying process. Or, place the knitting in front of a heating vent in the winter.
6. When the square is dry...store it in safe place and wait for the next Traveling Afghan square instructions to be revealed!
 |
| Square #1 of Traveling Knit Afghan - After Blocking |
These small Traveling Afghan squares are a great opportunity to practice blocking!
If you are making a large blanket in one large piece,
click here to read more blocking tips on this blog post on my new website.
There have been some questions about how to join the squares together. I'm planning to do a future blog post on this topic!
Click here to sign up for my email list to keep up to date on future tutorials and new pattern announcements.
I hope you enjoy participating in the Traveling Afghan project!
QUESTIONS: If you have any questions about the project....be sure to CLICK HERE to go to the information page on my website. There's lots of information and answers to frequently asked questions.
If you still have questions after reading...send me an email at: FiftyFourTenStudio@gmail.com.
Happy knitting!
Mary Lee
Fifty Four Ten Studio